basic old dough sourdough
Updated: Mon, 11 January, 2021
Always reserve a chunk of dough when making your bread. It is called 'old dough' or pâte fermentée and is one of the oldest and most reliable methods of making sourdough loaves.

Sourdough karma
Wild yeast doesn’t like my new kitchen. Either that or I have lost my sourdough mojo. Neither of those options pleases me much; in fact I’d be gutted if either proved true. But the fact is, I’ve struggled to create a decent sourdough starter since the building works finished and I took back control of the kitchen.
I buy the same flour. The water comes from a different tap but the same pipes bring it to my home. The airing cupboard which used to double up as the proofing chamber is gone, but I have the central heating mainframe/manifold/weird machinery cupboard now which is constantly warm too. I even have the dough proving oven programme.
My recent sourdough story
The first attempt which I nonchalantly fed for four days, thinking it would be a doddle like it used to, was a stillbirth. Not a single bubble. The second was given filtered water. It showed signs of life on day three and died on day four.
The next attempt used a different brand of flour. The next was a rye sour. Nothing worked.
Sourdough epiphany
Then (Doh! or even: Dough!) I remembered the ‘old dough’ method which uses fermented sourdough instead of starter. I made a tortured pain de campagne with starter number five or six, more persuading myself that it was fermenting than believing it really did.
I cut a chunk and made it join the failed starters jar collection in the fridge.
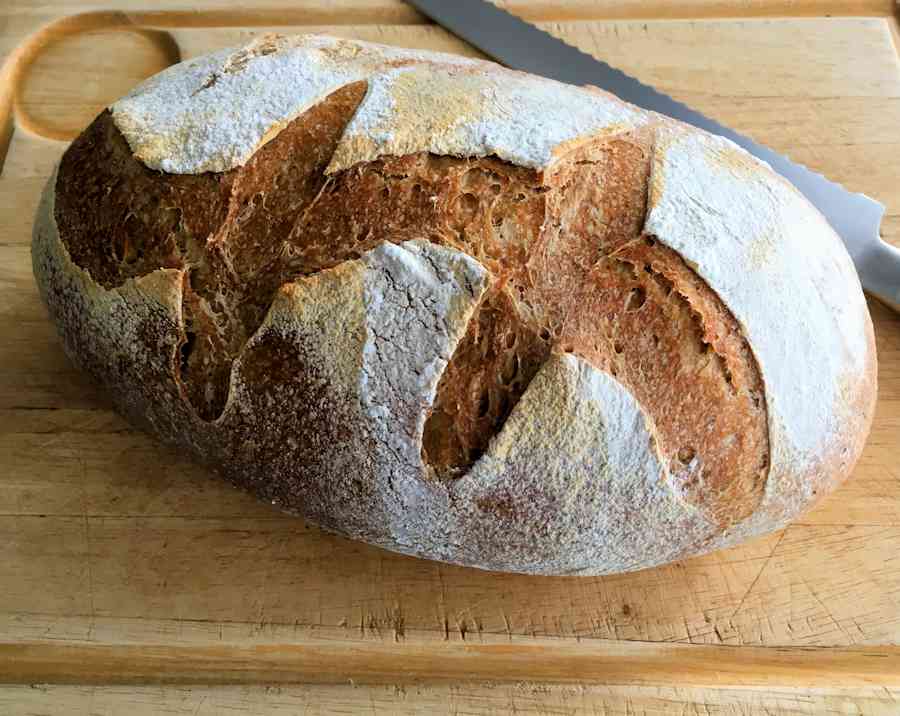
Old dough makes sourdough
It works. It needs a long cold proof and a long final rise but it makes a properly tasty loaf. Kudos here to Sourdough Baker whose detailed instructions were invaluable.
The chunk of dough first needs to ferment - it's called pâte fermentée for a reason. In a tub or a jar, not sealed super tightly, mixed with warm water it needs a week in the fridge to bubble up. The more bubbles, the better fermentation.
Long proof, long rise
The first step is the first dough or ferment, mixed up roughly and left to rest for an hour. The main dough follows and it's important to add the salt at the very end - after a chunk is reserved for the next loaf, of course. Once salted, it then hibernates in the fridge for twenty-four hours.
The following day it's shaping, the final rise and baking: ideally in damp heat on a baking stone, but a heavy baking tray will do the job too. The baking should be at the temperature decreasing by 20C every quarter of an hour. The initial blast of heat spurs the rise and the cooler and cooler conditions ensure perfect crust.
basic old dough sourdough
Servings: 1 large loafTime: 48 hoursRating: (2 reviews)
INGREDIENTS
- 550g white bread flour
- 50g wholemeal flour
- 100g old dough starter
- 300–350ml warm water plus some more for spraying the dough and the oven
- 12g fine sea salt
METHOD
1. The main thing of course is to cut off a chunk of dough when making your next sourdough; it best be before adding salt but it works with salt too. Keep it in a plastic tub or a bag in the fridge, not sealed tightly so it can breathe, for about a week – it’s ready to be used when it’s got a significant amount of bubbles.
2. You will need to start the process on the morning of day 1 to aim at baking at midday day 2.
Morning day 1:
3. Mix the old dough with the warm water; leave it for 10 minutes if the old dough was hard.
4. Add the wholemeal flour and half the white bread flour and mix into lumpy ferment. Leave it to rest in a warm place for an hour.
5. Add the remaining flour and start kneading manually or in a standing mixer with the dough hook attachment. When it comes together, leave it for another rest for at least 30 minutes and up to 1 hour.
6. Turn the dough onto a work surface; now it’s time to cut off a chunk of this dough for the next loaf! About 120g off will leave you still with a decent-sized loaf.
7. Flatten the dough into a rectangle, spray it with water and sprinkle the salt all over. Dock it into the dough with your fingers and roll the dough into a long cylinder. Turn it 90 degrees seam side up; flatten it again docking it with your fingers and roll up in the other direction to form a shorter cylinder. Repeat this at least until all the salt has been incorporated and no little wet salt pockets open up when you flatten the dough. Place it in a plastic container or a bag and leave it in the fridge for 24 hours.
Morning day 2
8. Take the dough in the container out of the fridge first thing and bring it to room temperature – it will take a couple of hours. When it’s reasonably warm, place it on the worktop and gently flatten for the last time; roll it up into a long sausage and leave it on the worktop, seam side down, to rest for 10 minutes.
9. Now pick it up in both hands, lengthwise, and stretch the surface by gently pulling the dough roll underneath with both hands; squeeze the base to seal up the seam. Place the loaf on a baking sheet lined with parchment and sprinkle it with flour. Place the tray in an inflated plastic bag (just blow into it and tie the ends) or cover with a bowl if you have one large enough. Let it prove for 2-3 hours, until an indentation remains in the dough when gently pressed with a finger. Make two or three slashes across the top with a sharp knife or a baker’s blade.
10. In the meantime preheat the oven to 200C/400F/gas 6. If you have a baking stone, put in in the oven to heat up. Place a small container with water on the bottom of the oven for moisture release (or use a spray bottle when the bread goes in).
11. If you’re baking on a stone, transfer the loaf onto it with the parchment; remove it halfway through the baking. Bake the bread for 1 hour, turning the heat down by 20C/70F every 15 minutes – so that you end up with the temperature of 140C/290F at the end of baking. Cool on a wire rack.
Leave a reply
Your email address will not be published
Your comments
Hi Andrew! Confused: I'm in the UK too and always weigh everything religiously on my kitchen scales (even water, hehe). I do provide cup and imperial measures in all my other recipes but not breads because that's where it's important to be precise. Anyway, hope your old dough turns into excellent new bread!
Andrew Thompson
@Andrew Thompson
I'm in the UK and I'm so glad you measure in grams because no one over this side of the pond has even the slightest clue of what a cup and a half or a tbs/tsp are! Its very annoying when finding gems like this just to have to skip them because its too much trouble to convert everything online. Thank you Anna and keep up the great work. BTW I usually bake with a sourdough starter but have this loaf started from 'old dough' on the worktop (Ok, sorry, counter to you ha ha) for its final rest as I type...its my first attempt so fingers tightly and all that! ??
Hi Brittany - thank you! And good luck, hope you're happy with the outcome.
Brittany
@www.bubbies.com
I love how you scored this sourdough, it looks fantastic. I'm interested to try this recipe out! Thank you for sharing!
Hi Maggie - I'm so happy my recipe helped out! Stay safe!
This recipe saved me during the great coronapocalypse. All the stores around here are out of bread and yeast to make bread, so I was looking for a way to use the ball about 650g of raw pizza dough I had in the freezer. I thought about doing a sour dough starter, but I don't really like sour dough and I didn't want to waste flour feeding it only to have it flop. Of course my kitchen scale went out this week, so I just cut the pizza dough ball into 1/6 sized chunks and let one chunk ripen in the fridge for a few days and threw the rest back in the freezer for later. Then I followed your guidelines, improvising here and there with the flour amounts. I used about 4 cups of all purpose flour because that is all I had. I kneaded in the last cup until it felt right. Worked better than I expected!
1
Push notifications
You are subscribed to push notifications.
You have unsubscribed.
Subscribe to push notifications. Get the latest recipes from Cuisine Fiend.
Cuisine Fiend's