I have married Italian panettone with English hot cross buns: ta-da! Bunettone has the Italian texture and English spices and crosses, and is absolutely delicious.
Panettone for Christmas, hot cross buns for Easter
Last Christmas my panettone was an astonishing success. I baked about a dozen large ones in total over December, gave some away but most were hoovered up for breakfasts, brunches, post-lunch sweets and once instead of dinner, between the two of us.
Easter means industrial quantities of hot cross buns in my house. Sticky with sugar glaze, fragrant with spice and featuring proper piped crosses. Okay, once I forgot to add the spices so they were ‘cross buns’. Another time I missed out the crosses in a rush to bake them, thus creating ‘not cross buns’.
But on the whole they are mind-blowing warm, delicious fresh and epic when toasted and buttered. And I have a completely perfect recipe for buns here for you to try.
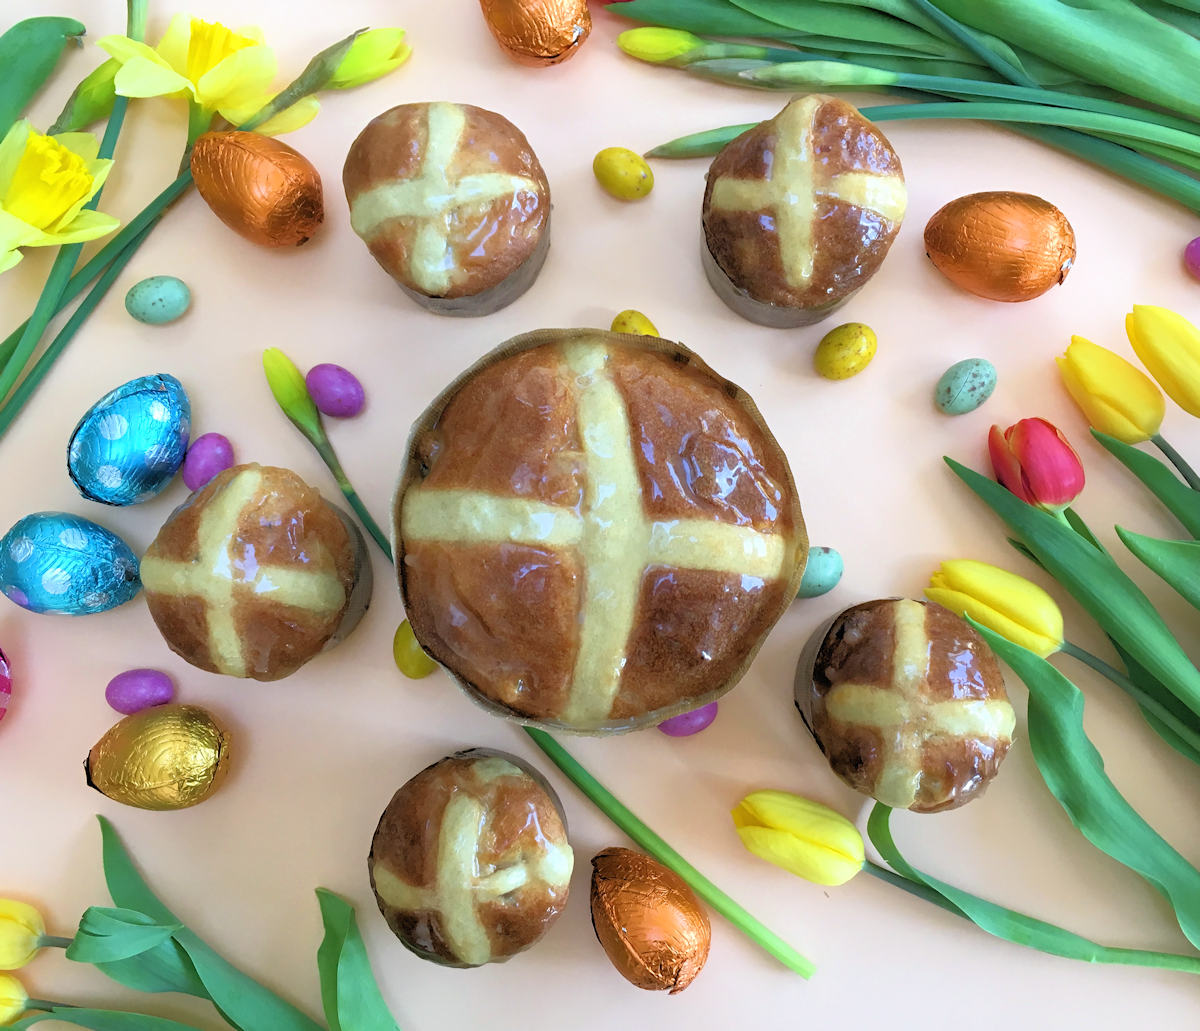
Hot cross panettone!
So there we have it: the above plus my everlasting aspiration to create a new baking confection has hereby resulted in the best of two, an exquisite combination of Italian and English (just like The Weather Man): bunettone.
Fluffy and airy like panettone, spiced and cinnamonned like the buns, and adorned with a piped cross. I defied the Easter chocolate sine qua non and added just raisins and candied peel to the dough.
And I thought it would be nice to make one large and 11 small bunettones, after the Simnel cake fashion of featuring 12 or 11 marzipan balls, for Jesus and 11 disciples (minus Judas, obviously).
Leavened with sourdough or yeast
I used the sourdough starter I reserve for San Francisco bread because it’s refreshed with yogurt and milk instead of water, giving it a rich, less sour flavour. Try ordinary water-based starter by all means. And if yeast is more of your comfort zone, increase the amount below to 20g fresh or 2 tsp instant, up the flour in the ferment to 375g and water to 250g.
It is just as much trouble to mix, knead, stretch, fold and shape as panettone, but it's great fun too.
How to make bunettone dough
It is labour-intensive, I won’t pretend otherwise. You need a starter so lively it bursts out of its container, and to start the process the night before baking. On the day you’ll be stuck in the kitchen most of the time.
The starter dough, aka the ferment, is made with sourdough starter and a pinch of yeast, sugar and egg yolks, butter and flour of course. It should expand overnight to triple its volume.
The next day it’s mainly mixing, kneading, beating the dough until it develops gluten strong enough to lift all this buttery, eggy richness. It must pass the windowpane test which is about stretching dough without tearing till it’s nearly see-through.
Then the fruit and citrus peel can be added and the dough put to rest briefly, stretching and folding it every twenty minutes or so.
Panettone cases for bunettone
I use panettone paper cases in the Easter edition too, but you can use cake tins for the large ones and mini moulds, ramekins or cups for the baby buns.
Once the dough is shaped and divided between the cases, it will need to rise up almost to the rim, while you prepare the crossing mix.
After baking you can either leave them to cool upright on a wire rack, or adopt the panettone approach by hanging the cases upside down. If that’s what you want to do, thread wooden skewers through the cases before filling them with dough. Then invert them by the skewers and prop on a clothes rack or a similar contraption.
And lastly but importantly: when they are cool and ready to serve, brush the tops with a simple glaze. Happy Easter!
More Easter baking recipes
Chocolate hot cross buns with sticky glaze and white chocolate crosses are messy to eat, difficult to toast and absolutely irresistible this Easter! Flavoured with cocoa and of course the 'hot' spice mix, with a crunch of cacao nibs.
Colomba di Pasqua, Easter Dove is the traditional Italian cake baked for Easter in cases shaped like a dove. A gorgeous, almond studded and orange flavoured colomba is perfect for Easter Sunday.
Traditionally Simnel cake was a rich yeast-leavened cake, with marzipan layer inside and marzipan topping. This adapted Victorian recipe is made with yeast dough and homemade marzipan.
More spiced bun recipes
Best hot cross buns ever: wholemeal, with tons of raisins, piped crosses and delicious sticky honey glaze. There’s no better spring breakfast than a buttered hot cross bun.
Yorkshire teacakes, with raisins or currants, toasted and buttered are the best tea time treat. And they are really easy to make.
Boller are Norwegian breakfast buns with cardamom flavour and a shiny glaze. Easy to make, they are gorgeous warm but as lovely toasted and buttered.