New recipes and updates

Get new recipes
in your inbox

Cuisine Fiend https://www.cuisinefiend.com

Find a recipe by ingredient

Dome cake

Updated: Thu, 5 August, 2021

⯆ JUMP TO RECIPE
Dome cake made from the lightest sponge, filled with layers of dark chocolate, raspberry mousse and vanilla buttercream, glazed with white chocolate ganache. The ultimate in ‘wow’ factor.

dome cake cuisinefiend.com

Dome cake is not your weekend bake – it’s a project. It will easily take up to three days, several bowls, buckets of cream and a bit of skill. But it’s THE cake to prepare for a special occasion, birthday or anniversary, when you want something outstandingly different and overwhelmingly indulgent.

My dome cake was inspired by a wondrous dessert I was once served in a French restaurant. An individual half-sphere covered with white chocolate, hiding lovely raspberry mousse and delicate sponge inside. It came from a dessert trolley that had no labels, and it (rather stupidly) didn’t occur to me to ask what it was called.

It was ridiculously delightful, and it got me thinking of a full-sized cake in the shape of a dome. So I went back home and started experimenting.

dome shaped cake with raspberry filling and buttercream cuisinefiend.com

How to make a dome cake?

Baking the sponge in a special, half-sphere-shaped tin would be the immediate solution but a/ such tins are hard to come by, and b/ I hated the thought of using a tin just the once and have it knocking about the cupboards purposelessly ever after. And it would be a solid half-globe as well.

But sponge, as the name suggests, is reasonably pliable so shaping it to a required silhouette should not be a huge problem.

And it wasn’t. So here’s all you need to know about the elements of this impressive gateau. And in fact each of them: the sponge, the chocolate mousse, the raspberry filling, the buttercream and the white chocolate glaze is a separate recipe, well worth noting and using in a simpler production.

dome cake made in a bowl cuisinefiend.com

The dome cake sponge

The sponge is the skeleton: the outer and bottom layers and a thin one in the middle, the latter possible to be skipped if the fuss becomes too much.

But an ordinary, English, Delia-style sponge won’t do here. The cake would be far too heavy.

Genoise is just the thing: it is the lightest, fluffiest and airiest type of sponge, but keeping its shape when moulded and filled. It’s quite a work of art, but if you follow the recipe, it unfailingly succeeds.

No egg separating, but the eggs must be beaten to five times the volume! To facilitate this, start off over a pan of simmering water, aka bain-marie. When they reach body temperature – importantly, they must start off at room temperature, otherwise you never get there – take them off the double boiler and whisk them to oblivion.

The little flour that goes in there must be perfectly sifted – don’t skip that step. Fold it super-gently, and then just a little melted butter is added, to give the batter stability.

After it’s baked, the fun part: drop the cake from a height onto folded towels. It helps distribute the air bubbles in the sponge and, counterintuitively, stops it from sinking. Turn it upside down, then right side up and it’s ready to unmould and cool.

genoise sponge with raspberry, dark chocolate and buttercream inside cuisinefiend.com

How to cut sponge into layers

A wire cutter for cakes is a nifty tool, but if you haven’t got one, there are some hacks. A super-steady hand armed with a super-sharp bread knife might do it just like that, but you only get one go at it, and bread knives are never sharp.

Mark the layers on the side of the sponge and use a length of cotton thread to wrap around it where you want to cut. Twist the thread as if you wanted to strangle the cake until it cuts through.

how to cut sponge layers cuisinefiend.com

How to make chocolate mousse frosting

This chocolate frosting is one of the easiest: it is nothing but a whipped chocolate ganache. Stick to the correct proportions of chocolate to cream and don’t over-whip. That’s all.

It can be made with milk or white chocolate too (without the sugar) for another occasion. Indeed it is delicious on its own, served as a mousse for dessert.

How to make raspberry filling for cake

This is an excellent filling that keeps its shape, isn’t too sweet and needs no gelatine. It is simply raspberries cooked down with sugar, pureed and thickened with some corn flour.

If you don’t think raspberry seeds are going to cause anyone problems, you can even skip the pureeing process. In fact, the filling will set quicker and better with the seeds in.

raspberry filling for cake and pastry cuisinefiend.com

It’s great to use in cakes as filling and will make a nice contrast with buttercream, being also lighter and tangier than jam. But it’s absolutely fantastic as pastry filling: Danish, tarts and tartlets because it can be baked with the pastry.

The easiest buttercream

I have made some gorgeous Swiss meringue buttercreams, but the dome cake is a massive venture so I want to cut a few corners where possible. And there’s nothing wrong with the simplest vanilla buttercream, the better for it if you can use real vanilla pods.

Just remember to start with soft butter and beat it into feathered peaks. The amount of sugar must be nearly twice as much as butter, or it will taste like butter. And a little cream added at the end makes it lighter.

easy vanilla buttercream cuisinefiend.com

Step by step: how to build the dome cake?

A bowl, the size of the baked sponge or bigger, lined with cling film, will be the mould. Once the sponge is cut into layers, press one into the bowl cut side up.

lining bowl with sponge cuisinefiend.com

The dark chocolate mousse will go onto the sponge in not too thick a layer, just so we manage to fit all the fillings into the dome. If time allows, chill it to set before spreading the raspberry filling next, up to just below the edge.

filling layers of dome cake cuisinefiend.com

Next comes the thinnest, middle layer of the sponge, trimmed to size.

middle layer

Follow that with buttercream, piped in or just spooned. It's best to work with it at room temperature. The final sponge layer will come on top, which will afterwards be the bottom. Complicated? Not at all.

how to make dome cake in a bowl cuisinefiend.com

The assembled dome must now chill and set in the fridge, for at least an hour and overnight if possible.

And now the big moment: turning the cake out! Gently, onto a cake base, peeling the cling film off carefully if it stuck a little.

dome cake made in a bowl cuisinefiend.com

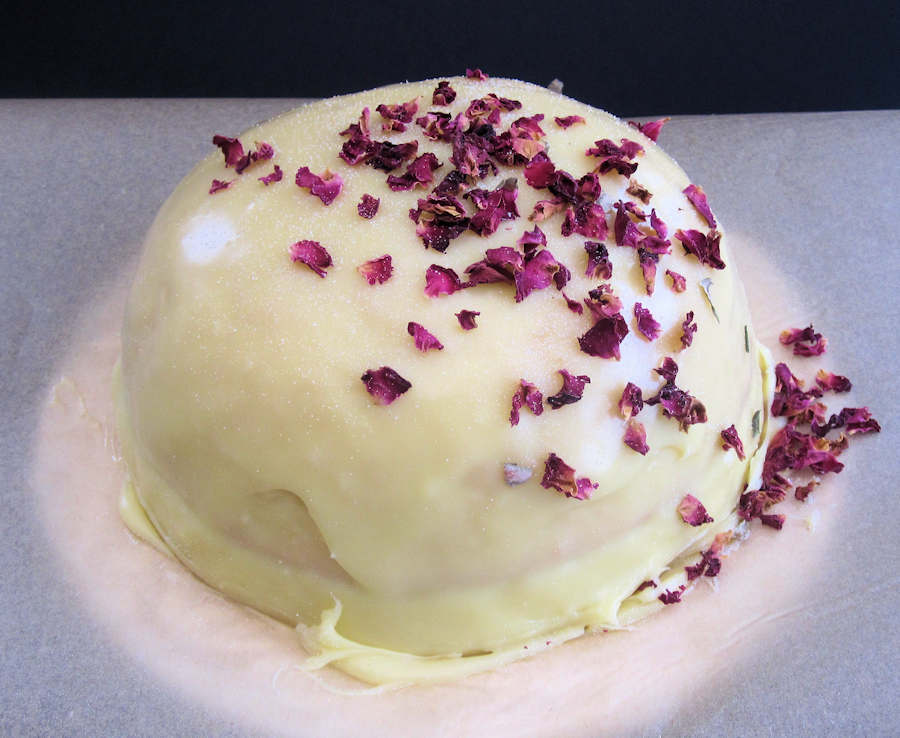
And onto the final touch - glazing the dome with white chocolate ganache.

White chocolate ganache frosting

Ganache is the loveliest frosting: it always looks and tastes good. And who doesn’t like creamy chocolate on a cake?

For spreading over the finished dome, as opposed to the whipped dark chocolate mousse that went inside, the ganache must be thick: a lot of chocolate and only a little cream. The addition of a small knob of butter will make it glossier.

white chocolate ganache cuisinefiend.com

It sets fast so needs to be used immediately after mixed.

dome cake glazed with ganache cuisinefiend.com

And there we have it! One dome cake. It might not be as perfect as those sky-high painted works of art that my talented neighbour makes, but it is accomplishable for a less artistic cook and baker, like me. Or perhaps you?


Dome cake

Servings: 12Time: 4 hours plus chilling

INGREDIENTS

  • For the genoise:
  • 80g plain flour
  • 10g corn flour
  • 3 whole eggs and 1 egg yolk
  • 90g sugar
  • 30g butter, melted and kept warm
  • For the raspberry filling:
  • 200g frozen raspberries
  • 100g water
  • 100g caster sugar
  • ½ tbsp. lemon juice
  • 15g corn flour dissolved in 30ml of cold water
  • For the dark chocolate layer:
  • 60g good quality dark chocolate, 70% cocoa
  • 150ml double cream
  • 1 tsp butter
  • 1 tbsp. icing sugar
  • For the vanilla buttercream:
  • 100g butter, softened
  • 185g icing sugar
  • 2 vanilla pods, seeds scraped
  • 2 tsp double cream
  • For the white chocolate ganache:
  • 150g good quality cooking white chocolate
  • 60g double cream
  • 1 tsp butter
  • rose petals, for decoration (optional)


METHOD

The genoise can be, and in fact benefits from being made a day in advance – it will cut and handle much better when it’s sat in the fridge overnight.

1. Preheat the oven to 180C/350F/gas 4. Prepare a round 20cm tin by buttering and flouring it thoroughly. Place a disk of parchment at the bottom. Mix the flours and sift them 2 or 3 times.

2. Prepare a pan with hot (but not boiling) water (bain-marie) large enough to contain the bowl you will be mixing the batter in, but not touching the water. Break the eggs and the yolk into a large bowl or the bowl of a standing mixer. Place the bowl with eggs in the bain-marie and whisk for a few minutes adding the sugar little by little, with a hand whisk or a hand held mixer until the eggs come to about body temperature. Make sure the eggs do not start to scramble!

3. Remove the bowl from the hot bath and beat in a standing mixer with a balloon attachment, or with a hand held mixer, at high speed for 5 minutes, adding the rest of the sugar if you didn’t manage it all at the initial stage. Reduce the speed to medium and beat it further 5 minutes. The eggs should be five times the original volume, completely pale and quite stiff.

4. Sieve the flour over the egg mix from high above in two or three goes folding it in very gently each time before sieving in more. Make sure the mix does not deflate. Scoop a couple of heaped spoonfuls of the batter and mix with the warm butter, then fold it all gently back in.

5. Pour the batter into the tin and twist it sharply to remove large air bubbles. Bake for 25-30 minutes until the sponge crackles slightly when pressed with a finger and leaves a small indentation. Take out and drop from 20cm height onto a couple of folded tea towels, two or three times. This is the best part, and it works so well it’s amazing – contrary to appearance, it stops the sponge from collapsing and sinking. Turn the tin upside down onto a wooden board lined with a paper towel and leave for 5 minutes. Turn it the right side up, remove from the tin and cool completely on a cake rack. Wrap in cling film or a plastic bag and chill for at least a few hours.

6. To make the raspberry filling, place the frozen raspberries, water, sugar and lemon juice in a pan and bring to the boil. Simmer for about 15 minutes until the raspberries have broken down.

7. Pass the mixture through a sieve to get rid of the pips and return to the pan (you might not bother if you think the seeds are not going to be a problem for anyone, in fact the filling sets better with seeds). Whisk in the corn flour slurry, stir in well and let it bubble for another 5 minutes until it thickens considerably. Transfer it to a bowl and cool completely. Chill in the fridge for at least a couple of hours and best overnight.

8. To make the dark chocolate mousse, break the chocolate into small pieces into a bowl and add the icing sugar. In a small pan or in a microwave bring the double cream with the butter to the boil and pour it boiling over the chocolate. Leave to stand for a couple of minutes and then stir it well. Leave to cool completely, then place in the fridge for at least half an hour.

9. Whip the chilled chocolate mix with a hand whisk or an electric mixer until it thickens, lightens in colour and has a mousse consistency – don’t over-whip. If that happens, add a spoonful of cream to the mousse and gently whip it in.

10. To make the buttercream, beat the butter until pale and fluffy. Still beating, add the icing sugar by a couple of spoonfuls. Add the scraped vanilla seeds and the cream, and whisk it in.

11. To assemble the cake, line a 20-23cm bowl with cling film. Slice the genoise horizontally into three layers using a cake slicing wire, a very sharp knife or a cotton thread (make a shallow incision with a sharp knife along the edge, halfway through its height. Take a length of cotton thread and wrap around the cake, fitting it into the incision. Twist the thread as if you wanted to strangle the cake until it cuts through). The middle layer should be really thin, as it’s to go between raspberry and buttercream inside the dome.

12. Place one layer, cut side up, into the bowl lined with cling film, pressing gently in. Spread a thin layer of the dark chocolate mousse over it (you might want to take the cake out of the bowl for this exercise and return it again). Chill for half an hour to allow it to set.

13. Next, spoon in the raspberry filling – as much or as little as you like, mindful that there should be space left for the buttercream. Place the thin middle genoise layer, trimmed to the right diameter, on top of the raspberry filling.

14. Pipe or spoon the buttercream over the previous layer, spreading some onto the edge as well. Finally, place the bottom cake layer to close the dome, cut side in. Press it gently in the middle, to spread the buttercream, and all around the edge to make sure it sticks. Chill in the bowl for an hour or overnight.

15. For the final decoration, turn the cake out of the bowl onto a serving tray or cake stand.

16. To make the white chocolate ganache, break up the chocolate into pieces as small as possible. Put the cream and butter in a bowl and microwave for 40 seconds until it boils vigorously. Immediately add the chocolate and leave to stand (in the microwave) for a minute or two. Whisk together into smooth ganache. This will be fairly thick ganache so spread it with a palette knife over the dome cake, rather than pour it over.

17. Make sure the sides of the cake are covered with ganache, then sprinkle some rose petals over it or decorate according to your taste.

18. Chill, trim the edge of the ganache pooled at the bottom of the cake and transfer to a clean serving plate.

Originally published: Tue, 19 April, 2016


NEW recipe finder

Ingredients lying around and no idea what to cook with them? Then use my NEW Recipe Finder for inspiration!

Recipe Finder


Leave a reply

Your email address will not be published

Characters left 800
Comment*
Recipe rating
Name*
Email address*
Web site name
Be notified by email when a comment is posted

* required

Your comments

Anna @ CuisineFiend
Hi Andy - 1 tsp. I've updated the recipe, thanks for pointing it out.
2 years ago
Andrew
@Andy
What's the amount of butter in the chocolate mousse?
2 years ago
1 

Cuisine Fiend's

most recent

About me

Hello! I'm Anna Gaze, the Cuisine Fiend. Welcome to my recipe collection.

I have lots of recipes for you to choose from: healthy or indulgent, easy or more challenging, quick or involved - but always tasty.


Newsletter

Sign up to receive the weekly recipes updates


Follow Fiend